Monarch Butterflies

As you may have seen monarch butterflies are now officially endangered as of this year. Up until now they have been listed as threatened, and while many of us anticipated this move it was still difficult news to hear. As we enter mid August you may have started to see more of these magnificent migrants through-ought central Maryland.

In February the monarchs will start mating in preparation for their trip north, from forested mountains in the Mexican state of Michoacan, west of Mexico City, a female monarch will lay over 400 eggs in the oyamel fir trees that populate the mountains. Due to global warming and illegal logging this vital habitat is at risk, and with it the entire monarch population. In a controversial move a group of Mexican scientists have been moving the fir trees further up in elevation in the hopes of preserving them from the harmful impacts of rising global temperatures. 

By March the monarchs that arrived in Mexico in October and November will be ready to head north again along with their recently hatched and metamorphosed offspring. Gliding on the warm spring air they will begin entering Texas, southern California, Arizona, and New Mexico. On this journey the female monarchs will be searching diligently for milkweed plants on which to lay their eggs. Monarch caterpillars only eat milkweed, a plant that is widely toxic for other animals, and this provides them with some additional protection from predation. By late June and early July we will start to see these beautiful insects throughout Maryland. 

What is truly remarkable about the monarch life cycle is the unique set of generations that they go through. The monarchs that travel to Mexico live between 6 and 9 months, but the monarchs born in the spring and summer only live 2-6 weeks after reaching their adult stage. What causes these tiny insects, weighing less than a gram, to have just distinct life expectancies? This is still under great study, but the current hypothesis is that in autumn with the changing of daylight and temperatures triggers a hormonal change in those monarch butterflies that tell them to migrate south. 

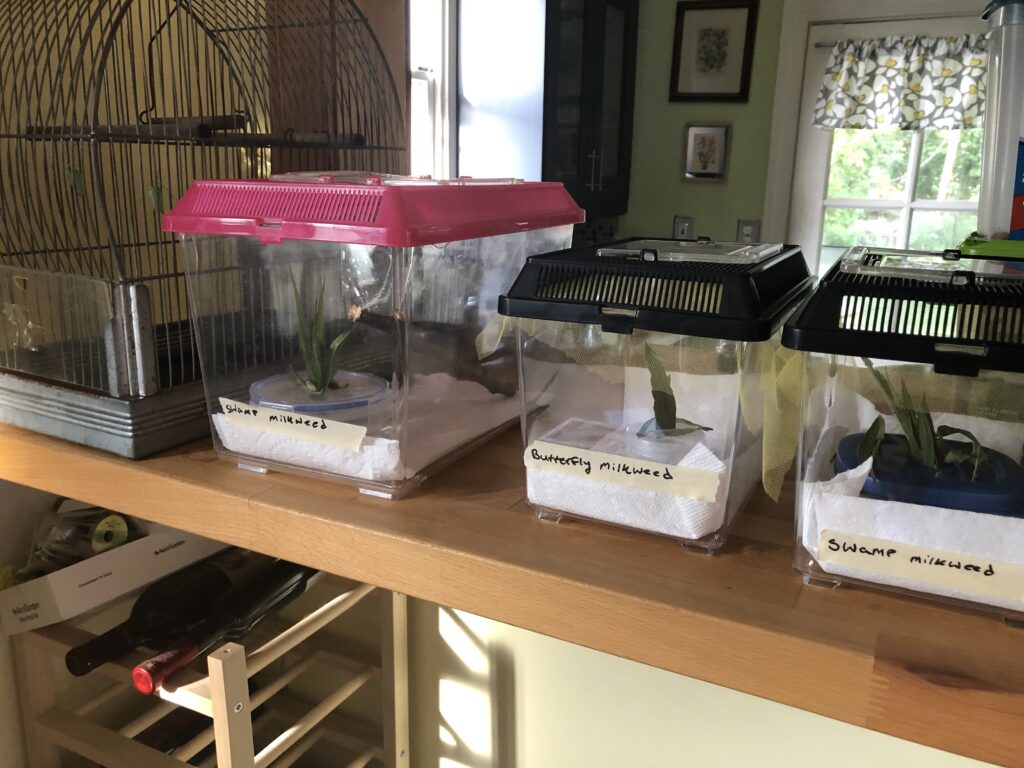
For the past two years I have collaborated on a citizen science project to help propagate these incredible pollinators and weary travelers. Monarchs are a threatened species, and while some reports indicate that 2019 was one of the largest recent migrations recorded they still need support from gardeners and preservationists for their population to rebound from recent record lows. The most important thing you can do is to plant more milkweed in your yard and community gardens. Monarchs rely exclusively on this plant to lay their eggs and is the only food source for growing caterpillars. 

While, as mentioned above, the most important thing you can do to support monarchs is to plant more milkweed, there is a growing number of individuals who are bringing these magical creatures inside to help increase their chances of survival. 

As more research has been accumulated we’ve learned more about how to best do this. One newer piece of information is that if you’re bringing in monarch caterpillars towards the end of the season late August/September/October you want to make sure that they’re still exposed to the changing temperatures and levels of light and moon cycles as autumn returns. One solution is to keep the caterpillars out on a screened in porch so that they are still protected from predators and the elements but will receive this vital information to let them know it is coming time to migrate to Mexico. If they’re kept inside entirely they may not get the news that it’s time to fly south and may linger in the area and end up dying when it gets cold. This is still a developing science so cause and effect is still a little unclear, but hopefully we’ll learn more in the coming years.

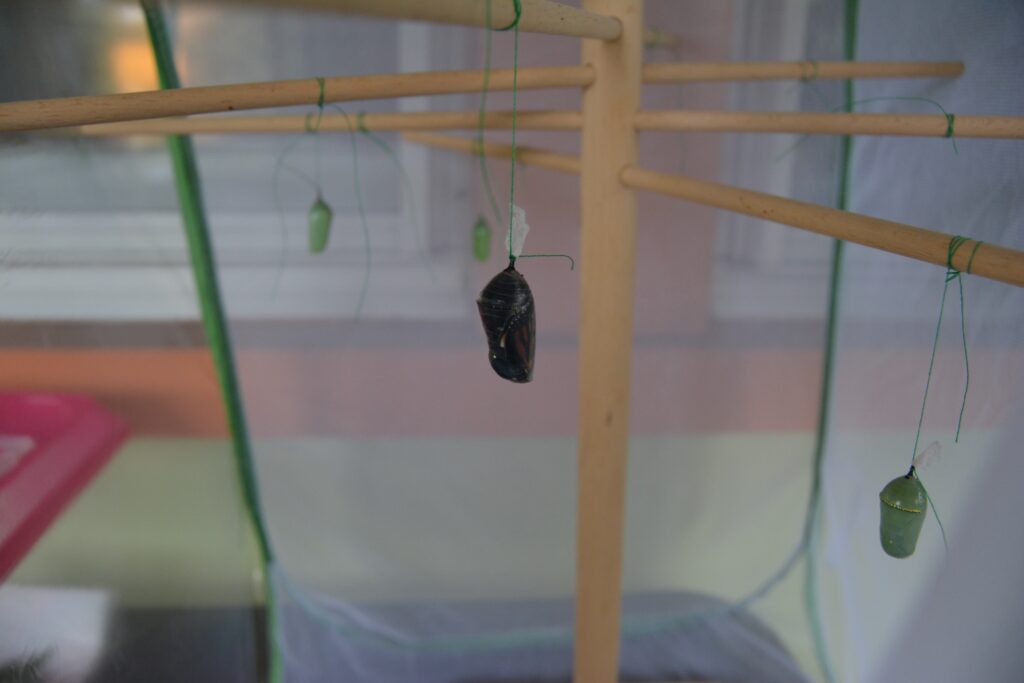
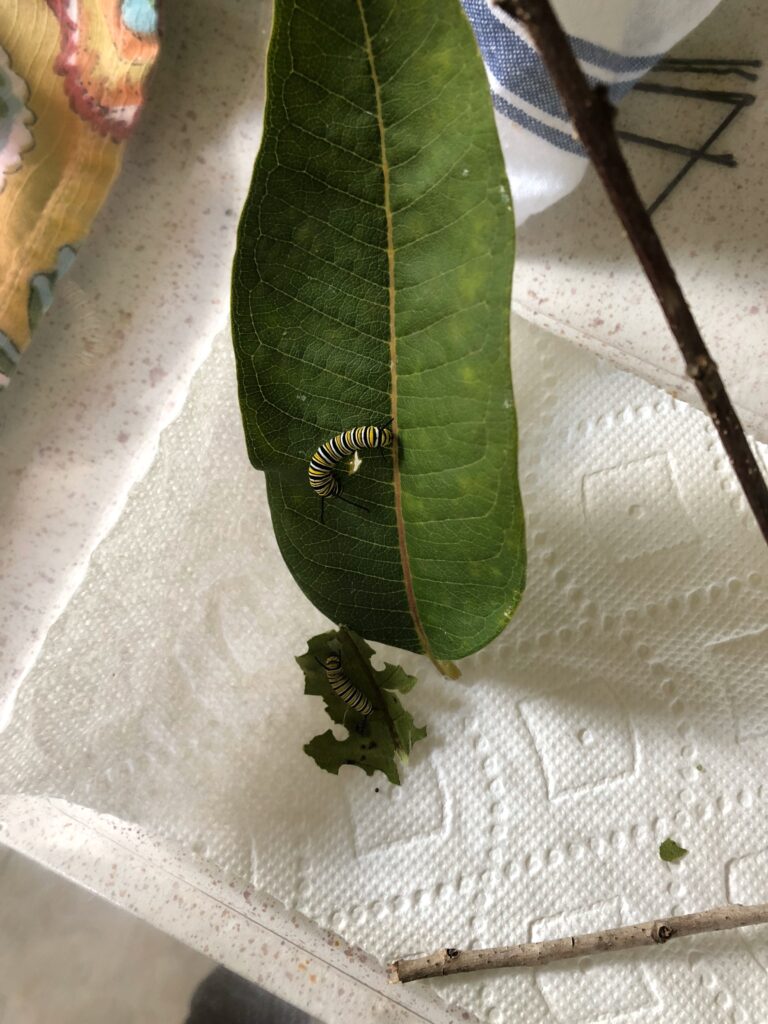
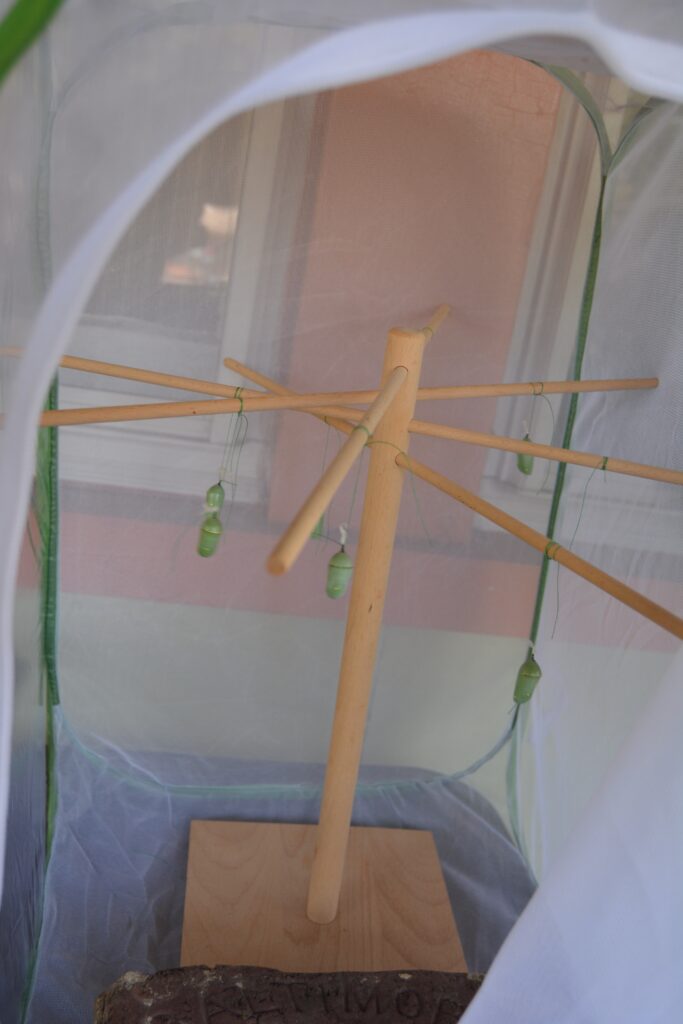
Another important consideration is that monarch caterpillars greatly prefer to eat the kind of milkweed that they hatched on. So, if you bring in a caterpillar that was on a Common Milkweed be sure that you provide them with plenty of that variety to eat during their development, and they eat a lot! The same is true of if you find them on Swamp Milkweed or Mexican Butterfly Weed. You do not need to provide water for them, they get all of the hydration they need from eating the leaves, but it can be helpful to cut a small hole in a small tupperware to make sure the leaves stay fresh, just make sure the hole is not big enough for the caterpillars to get through because they can fall in and drown. Monarch caterpillars typically stay in their larval stage (growing through instars of molting) for 9 – 14 days, they need daily observation, addition of milkweed leaves, and cleaning of their enclosures during this period. At the end of this phase they will find something in their enclosure to attach to and go into “J” after a day or so they will begin the transition to their pupa stage. This is quite a sight to see!

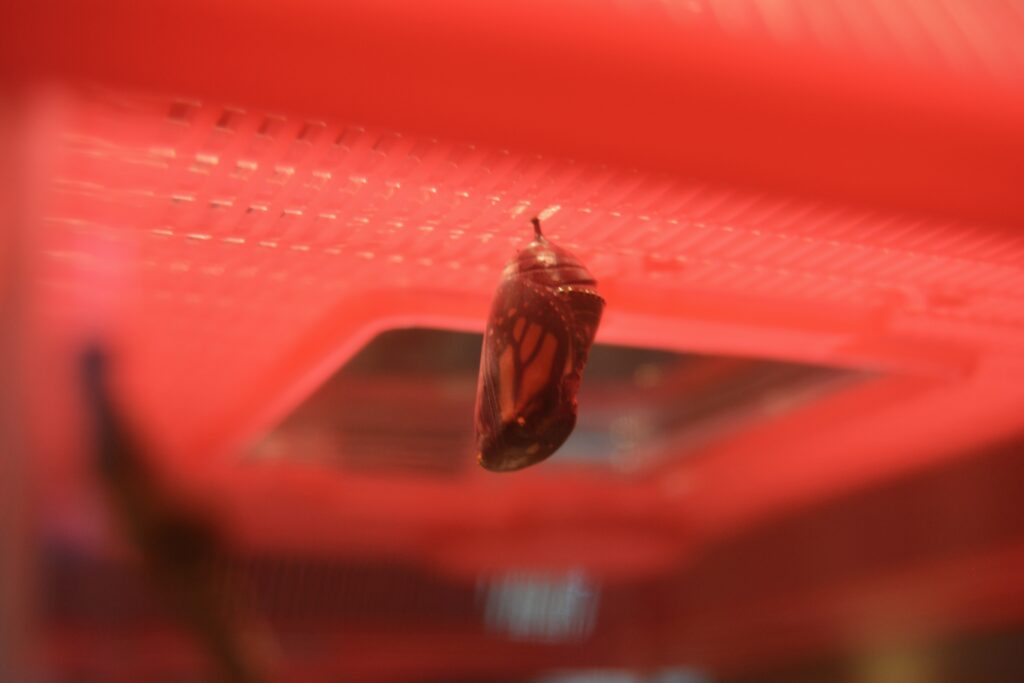
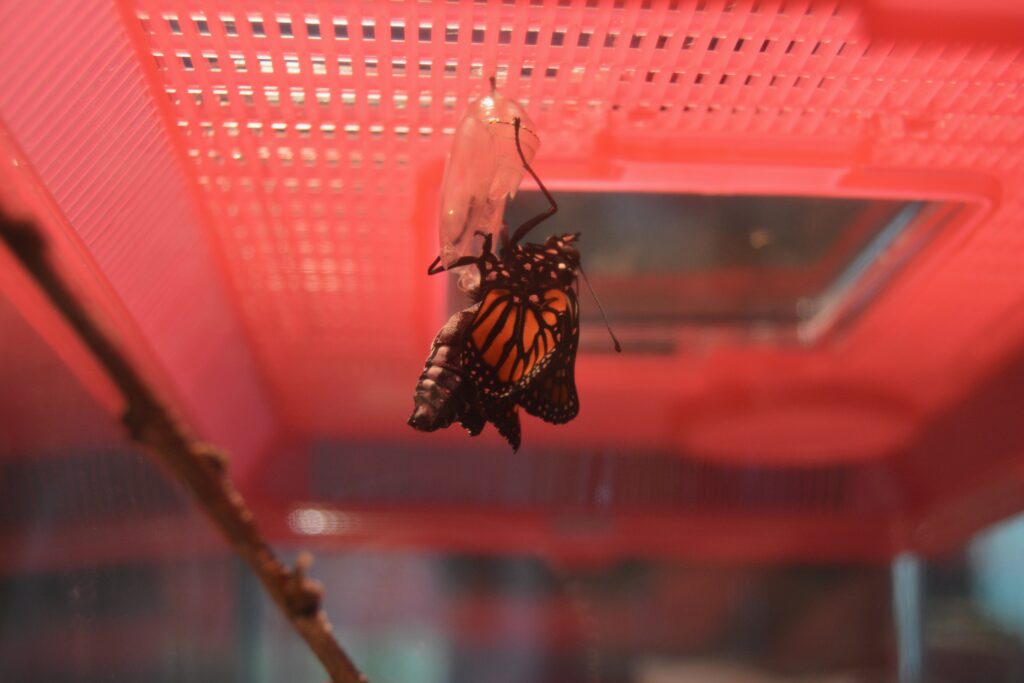
Monarch will remain in the pupal stage for 10 – 14 days. Right before they emerge the chrysalis will turn very dark, and you may be able to see the signature wing markings that monarchs are known for. As the butterfly emerges, it is essential that it is not disturbed, because if they fall they will likely die. It will take several hours for their wings to fill and dry, liquid will drip off of them, but don’t worry it’s not blood! 

Once they begin to emerge it moves very quickly, and before you know it, there is a damp and rumpled butterfly joining your life! 

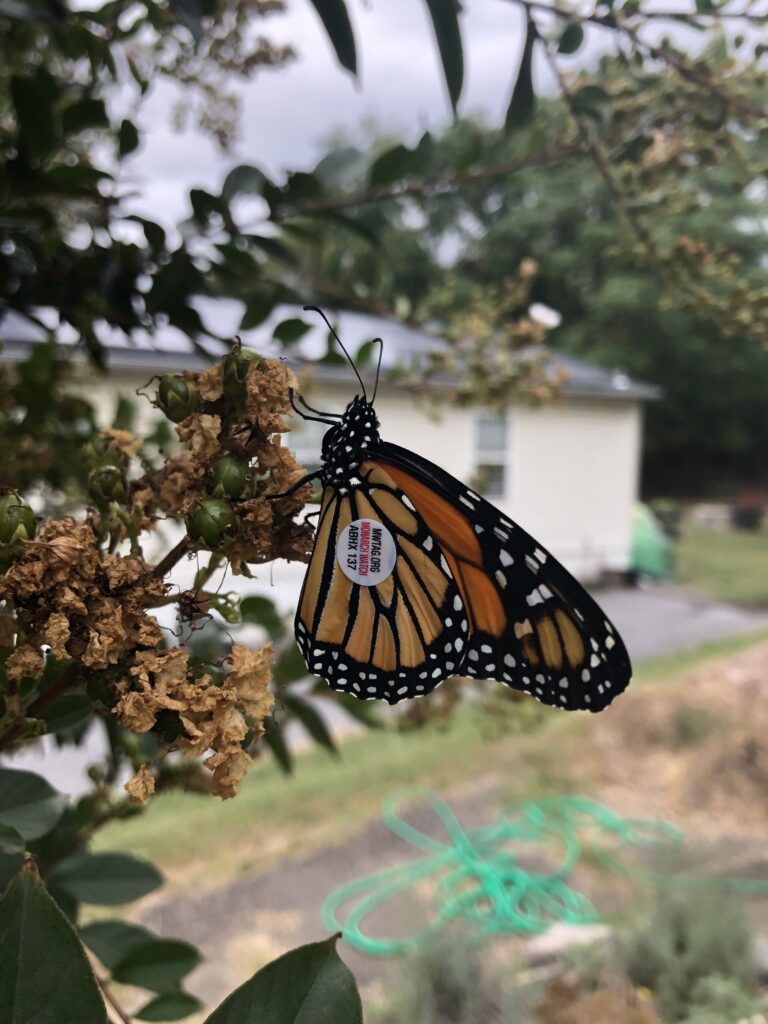
There is a citizen science program called Monarch Watch (https://www.monarchwatch.org/), where you can purchase tags to place on your new butterflies. This is especially important in the times leading up to migration, so that they can track any found butterflies and get a better picture of their migratory patterns. It wasn’t until 1975 that Fred Urquhart discovered that these migrations crossed the US border into Mexico and revolutionized our understanding of this incredible species. There are potentially more revelations on the way and by being citizen scientists we can help move those discoveries forward. 

The health of the monarch butterfly is a true barometer of the overall wellbeing of our planet, and a stark reminder that the borders of nation states are lines made by humans, and as invisible to nature as the wind is to us. 

References:

https://monarchjointventure.org/news-events/news/estimating-the-number-of-overwintering-monarchs-in-mexico

https://www.nature.com/articles/d41586-019-00190-1

https://monarchlab.org/biology-and-research/biology-and-natural-history/breeding-life-cycle/life-cycle/

http://www.flightofthebutterflies.com/

https://www.monarchwatch.org/

Metheglins: Herbed Meads

Metheglins are herbed meads, and are considered one of the oldest ways of preserving herbal remedies for later consumption. It makes sense if you think about it, readily available clean drinking water is still in short supply in many parts of the world, and while modern water filtration systems have proliferated in some places, we may also see increased precarity in accessing drinking water and while alcohol is no substitute for regular drinking water we may want to consider older methods of preserving medicines when possible.

One major key to metheglins is that you must select herbs that have water-soluble constituents rather than those that are fat-soluble. One of the first herbed meads I made years ago was a ginger and turmeric mead, and while delicious, was largely ineffective in bequeathing any of the healing properties I was looking for due to the herb/plant material needing fat in order to be used by the body.

Some examples of herbs that are good to use in metheglins: Chamomile, motherwort, red clover, red raspberry, elderberry, yarrow, lemon balm, rose, hops, hibiscus, skullcap, and oatstraw. Experiment and see what you like!

I taught a 1 hour class on this recipe for Wild Ginger’s Bloom series, you can access a recording of that if you sign up here.

Basic Equipment Needed for Wine/Mead Making:

  • Primary Fermenter
  • Yeast
  • Secondary Fermenter (carboy)
  • Hydrometer 
  • Airlock
  • Beaker
  • Food safe sanitizer
  • Racking kit
  • Wine bottles
  • Corks

Basic Metheglin Recipe:

  • 5Lbs honey
  • 2.5 gallons water
  • 1 1/2C dried rose petals
  • 1/2C dried lemon balm
  • 1/2C dried hibiscus
  • 1Tbs 2tsp acid blend
  • 1Tbs yeast nutrient
  • 1 crushed camden tablet (optional)
  • 1 packet D47 yeast

In a large stock pot bring the water to a boil. While water is heating up use your sanitizing spray to sanitize your primary fermenter.

Using either a mesh fermentation bag or large tea bags portion out the dried herbs and place them into the primary fermenter.

Once the water is boiling, allow to cool for 5 minutes, and then pour over the dried herbs into the primary fermenter.

You will now add the 5 pounds of honey, and using a sanitized spoon, mix well until combined.

Add the acid blend and yeast nutrient.

Wait until the liquid is room temperature and then add the camden tablet if using. Camden tablets provide a little extra in terms of sanitizing.

24 hours after you add the camden tablet (if using), sanitize the beaker and your turkey baster. Fill the beaker within 2 inches of the top and take your readings with the hydrometer. You must do this before adding the yeast! Make sure to record the measurement in a notebook or document that you’ll be able to come back to throughout the fermentation process.

Add the yeast and stir with a sanitized spoon. If you are scaling this recipe, one important thing to note is that one packet of yeast will ferment up to 6 gallons of mead or wine. Do not use more than one packet of yeast unless your liquid content is higher than that.

Fit the airlock into the lid of the primary fermenter.

Stir once a day for 7 days, making sure to sanitize the stirring utensil each time.

After 7 days it’s time to rack (move the mead from one container to another) from the primary fermenter into the secondary fermenter (carboy). For this recipe and scale a 3 gallon glass carboy is best, you want there to be minimal head space so that there isn’t too much oxygen exposure.

Sanitize the carboy and then racking wand and tubing. I like to put the primary fermenter on a counter a day or two before I rack so that more of the sediment is settled. The key with racking is making sure that you’re not stirring the sediment as much as possible, when making wine or mead at this scale racking is the primary method of removing sediments. Sediments cloud the look of the wine or mead but they can also contribute to it tasting “off.”

Racking takes some practice, but my method is to use fill the tube and wand with tab water, plug both ends with my fingers, place the racking wand in the primary fermenter and then release the tube end into a glass quart jar. Let the water and just a bit of the mead go into the jar and then press your finger over the tube end and move to the secondary fermenter. This should have started the suction function, but if not fill with water and try again.

Fill the beaker within 1 inch of the top with the mead and set aside.

Let the primary fermenter empty into the second fermenter, be careful not to disturb the wand, since this will stir up more sediment.

Fit the secondary fermenter with a bung and airlock. Place the secondary fermenter somewhere dark that stays at roughly the same temperature. The floor of a closet is generally ideal but if you have a less trafficked part of a finished basement that will be fine too.

After a month you’ll want to rack again and also take a reading with the hydrometer. You can give it a taste each time as well to see if the sweetness is to your liking, the flavor will develop other time but the sweetness or dryness after bottling will stay fairly consistent.

I like to make sure that the hydrometer reading is staying at zero across a few rackings before bottling. The concern here is that if it’s not actually done fermenting then it could continue to ferment in the bottle and worse case scenario shoot the corks out of a the bottle.

Bottle and let age 6-12 months!

Baltimore Peach Cake

I grew up eating Baltimore Peach Cake and my mom and I experimented with a variety of different recipes (before the internet!) As an adult I’ve gone back to the super thin yeast dough base, so it’s very much not a cake, but still delicious!

Time: 45 minutes active, 2 hours 30 minutes passive

Ingredients:

  • 2 Tbs regular sugar
  • 2 tsp 1/4 tsp yeast
  • 2/3C whole milk at room temperature
  • 1 large egg at room temperature
  • 2C all purpose flour
  • 1/2 tsp salt
  • 4 Tbs unsalted butter at room temperature
  • 3-4 Large ripe freestone peaches (these are peaches that don’t stick to the pit, super important for this recipe
  • 1/2C jelly of choice
  • Powdered sugar for dusting

Combine yeast, 1 tsp sugar, and milk in a medium bowl by pouring the yeast over the milk, let sit for 5-10 minutes or until the yeast foams a bit. Add the egg and whisk.

Using the large bowl of a stand mixer combine the flour, salt, and remaining sugar and mix. Attach the dough hook to the mixer. Add the milk mixture and turn on the mixer to medium for up to 5 minutes or until the dough comes together.

This is a sticky dough, but you want to make sure it comes together well. Transfer to a large buttered bowl, cover with plastic wrap and place somewhere warm to rise until it doubles in size (approximately an hour.)

Butter a half sheet pan well.

After the dough has doubled in size, gently knead down and then spread into the pan. It’s going to be pretty thin, but crucially you want it to be even. Sometimes I use a small rolling pan to make sure it’s evenly distributed. Once spread evenly cover with plastic wrap and place in a warm spot to rise for an hour.

Preheat the oven to 350*

Take the jelly of your choosing and put it in a small sauce pan on the stove, heat over lower until it achieves a syrup-like consistency. I used dandelion jelly I made last year for this one, I’ve previously also used elderberry, peach, and red currant, experiment and see what you like best.

Once the dough has finished its rise, generously brush it with the melted jelly. This should use approximately half of the melted jelly

Half the peach once and then cut that half into a quarter. Slice the quarter thinly into 1/8th-1/4 inch slices, lay them so they are just barely overlapping.

Once the peaches are placed, brush them with the remaining jelly.

Put half of the powdered sugar (1/8C) in a sifter and spread over the top of the cake.

Bake for 25-30 minutes until the edges are browned and the peaches have started to pucker. Let cool and enjoy!

Gluten Free Pie Crust

I use this a lot for making quiche (when you have backyard chickens, you make A LOT of quiche!) and there are a number of strictly gluten free people in my life. It’s a high dairy recipe, but the texture is lovely and it holds up well with a heavy filling.

You can also use this for a sweet pie as well, you’ll just want to consider adding some sugar in the crust recipe. If you want to add a top to the pie then 2X the recipe.

Time: 45 minutes active and 2 hours passive

Ingredients:

  • 1 1/2C Gluten free flour. I generally use King Arthur or Better Batter. Crucially I like to use GF flour that already has xanthan gum added in the proper proportions. If your GF flour does not have xanthan gum added, you will add 3/4 tsp to this recipe.
  • 1/4 tsp baking powder
  • 1/2 tsp kosher salt
  • 6 Tbs chilled unsalted butter
  • 1/2 sour cream measured out and chilled
  • Ice water

Unwrap the butter and slice into small cubes, gently separate the cubes, put into a bowl and put back into the refrigerator for at least 20 minutes.

Mix the flour, baking powder, salt together in a large mixing bowl. If your flour does not have xanthan gum added, add it here, but double check because adding extra will make the finished crust very tough.

Add the butter cubes into the dry, and combine by pinching the butter cubes until they start to create a shaggy dough. There should be lots of dry flour at this stage still. Add the sour cream and continue to mix by hand.

Once the sour cream is mixed in, set up your bowl of ice water. Adding 1 tsp of water at a time mix by hand until the dough is reasonably coming together. The key to good pie crust is to not overwork the dough, you want to get the ingredients combined but exhausting the dough will result in a tough and possibly uneven cooking. Do not overwork the dough at this stage.

Lay out plastic wrap on your counter and turn the dough out on to it (or half of the dough if you’ve doubled the recipe). Press the dough into a flat round, making as even as possible, about 1/2-1/4 inch thick. Wrap the round tightly and chill for at least two hours in the fridge, but up to two days.

Once chilled, prepare the 9inch pie pan by buttering heavily with unsalted butter. Dust a pastry cloth or clean dish towel with GF flour and place the unwrapped round on it.

Let dough sit at room temperature for 10 minutes.

Using a rolling pin, starting at the center of the round begin to roll out the dough. It will likely crack to some extent, which is ok in moderation, using a sharp knife trim the edges and use the trimmed pieces to patch any cracks or holes forming in the center. These patches may not affix to the rest of the dough but you want to make sure there are no holes for the filling to escape from when baking.

Using the pie pan as a reference, measure if the dough has been sufficiently rolled out, it should be consistently 1/8inch thick at this point.

Using two spatulas, gently lift the rolled out crust and place it gently into the pie pan. Gently press the crust into the corners of the pan, and flatten against the edges. Using scissors or kitchen shears trim the edges at the top of the pan, if you are keeping the top of the pie open go ahead and crimp the edges using the pads of your fingers to make a wavy edge. If you are using a top piece of crust leave flat for now.

Fill crust with your preferred filling, if adding a top piece of crust, roll out like the bottom, you can cut out shapes with cookie cutters, or do a lattice design. Using a mix of egg yolk and 1 Tbs water, brush the flat edges of the lower crust, place the top piece on, and brush the top with the egg mixture as well.

Blueberry Lemon Verbena Pie

This is one of my favorite summer pies, I have four blueberry bushes and this is the primary dish they go into! This recipe is just for the filling assembly and baking, for my regular pie crust click here and for a gluten free pie crust click here.

Time: 20 minutes active and 35 minutes passive

Ingredients:

  • 2lbs fresh blueberries (washed and picked over)
  • 2/3C brown sugar
  • 20 lemon verbena leaves*
  • 1/3C flour (regular or GF)
  • 1/4tsp sea salt
  • 2Tbs fresh lemon juice
  • Zest of one lemon
  • 2Tbs unsalted butter
  • 1 egg whisked w/ 1Tbs water

*I have not successfully found a substitute for lemon verbena, I grow my own every year basically just for this pie, there is a unique taste to it that isn’t easy to replicate. You can use mint or lemon balm instead but it’s a very different flavor.

Preheat oven to 425* and make sure you have at least a lower crust in a pie pan, I usually stick that back in the fridge while I prepare these ingredients.

In a medium bowl combined brown sugar and thinly minced lemon verbena. Take a large soup spoon and press the pieces of lemon verbena into the brown sugar, you want to release the aromas and oils from the lemon verbena into the sugar. You don’t have to be exhaustive here, but give it a good press and mix!

Add the flour and salt to the bowl and mix, breaking up any sugar clumps.

Add the blueberries to the bowl and mix to coat well.

Zest 1 lemon, add to the bowl, and mix

Add the blueberry mix to the crust, and sprinkle lemon juice evenly over the mixture

Add the pieces of butter and then add the top piece of crust is using

Using your finger crimp the edges of the pie and brush the top with egg wash

Bake for 25-35 minutes and start checking at 25 minutes, crust should be golden brown and flakey

Pie Crust

I use this for both sweet and savory pies, but I leave the sugar out for savory crusts. This is specifically for a gluten centric crust, check out my gluten free pie crust here. This recipe makes enough for one bottom crust and one top crust. If you’re making a quiche, half this recipe.

Time: 45 minutes active + 2 hours passive

Ingredients:

  • 2 1/2 C all-purpose flour
  • 1 teaspoon kosher salt
  • 1 tablespoon sugar (for sweet pies)
  • 1 C cold unsalted butter, cut into 1/2inch cubes
  • Ice water

Unwrap the butter and slice into small cubes, gently separate the cubes, put into a bowl and put back into the refrigerator for at least 20 minutes.

I prefer to make this in a food processor but you can also do it by hand. In using a food processor start by adding 1 1/2C flour in with the S shaped blade (the plastic one if you have it), add the salt, and sugar if you’re using it. Pulse the ingredients a few times to mix in the salt and sugar.

Once combined, add the cut up butter, and pulse several times for a total of 15-25 seconds, or until most of the large clumps of butter are well coated in flour and cut up.

Transfer to a medium sized bowl and add the remaining cup of flour and mix by hand, pressing butter clumps flat between thumb and pointer finger. The key to good pie crust is to not overwork the dough, you want to get the ingredients combined but exhausting the dough will result in a tough and possibly uneven cooking.

The dough at this point should be somewhat combined but is likely pretty dry and “shaggy.”

Add water to your bowl of ice and start adding the ice water one tablespoon at a time. Mix by hand gently after each tablespoon, you want the dough to come together, but if you can still see some areas of non-mixed butter you know you’re on the right track. I usually use between 2 and 6 tablespoons but it varies from attempt to attempt.

Split the dough in half and put each half onto its own piece of plastic wrap. Flatten using the palm of your hand and fully cover dough, try to get it somewhat even here. Lay flat in the refrigerator for at least two hours.

When you’re ready to make your pie (or quiche!) heavily butter a 9 inch pie pan with unsalted butter. Take one of the flattened dough rounds out of the fridge and leave at room temperature for 5 minutes. Lightly flour a pastry cloth or clean dish cloth, place the dough round on the cloth and dust with flour.

Start rolling out the dough, there will likely be areas where holes form and the edges will likely be ragged. I use a very sharp knife or wheeled pastry slicer to trim the ragged edges and lightly patch any interior areas that may be too thin or have holes. Gently press the trimmed pieces over the holes, you won’t get them to stick but just want to patch any opening.

Once it is rolled out enough to cover the bottom, sides, and rim of pan, lift using either pastry scrapper or two spatulas and place gently into the pie pan. Press lightly to fit the dough into the pan, trim any extra hanging over the edge using scissors.

Fill with pie filling, and if using a top repeat the above rolling out steps. I like to use cookie cutters to make windows or designs in the top, but you can also cut using the pastry slicer and then create a latticing design. Before adding the top, brush the rim of the lower crust with a mixture of one beaten egg and 2 Tbs water. Once you have filled with filling add the top piece of crust and brush the whole top with the egg and water mixture, sprinkle with large grain sugar.

Bake according to the pie filling instructions, but you want the crust to be a medium brown.

Baked Mac & Cheese

Preheat the oven to 400*

Ingredients:

4C whole milk

1/2C unsalted butter

1/2C flour (GF flour can be used)

1Tbs salt

2tps garlic powder

1tps paprika (plus extra for sprinkling on top)

Couple dashes cayenne

14.5 oz box pasta (regular or GF)

3C Cabot extra sharp cheddar shredded

1C parmesan shredded

1/2C panko crumbs (regular of GF)

Step 1.

Cook pasta according to box directions

Step 2.

Shred parmesan and cheddar

Step 3. 

Microwave the milk until warm

Step 4. 

Melt the butter in a large pot, once melted removed from heat and slowly add the flour whisking. Continually whisk until roux turns light brown. Then slowly add milk while whisking. Return to heat and cook on medium until it thickens, add salt, garlic powder, paprika and cayenne. 

Step 5. 

Add both cheese into the pot and stir well, add the pasta and combine.

Step 6.

Pour everything into a cast iron dutch oven, cover in panko crumbs, and 1/2C of parmesan and 1/2C cheddar, sprinkle paprika on top.

Step 7. 

Bake for 25 minutes and you’re done!

Purple Dead Nettle Salve

I have made quite a number of wound and skin salves over the years, and one of my favorites has to be purple dead nettle. It is an incredibly effective healer, but it works a little slower than salves that include comfrey, I’ve personally had some issues with comfrey healing the top layer of my skin faster than the lower levels and ending up with itchy and inflamed tissue. That’s not going to be for everyone, but for gifting or general purposes I’ve found purple dead nettle to be well suited to a wide range of skin types and constitutions.

One of the best things about this recipe is the purple dead nettle is widely available in many backyards and nearby parks in much of the northern hemisphere. Purple dead nettle (Lamium purpureum) is often confused with henbit (Lamium amplexicaule), henbit also has medicinal properties but not what we’re using in this recipe.

This is purple dead nettle above!

Below is henbit (that one is not my picture)

They do look really similar, and are both in the mint family (so they both have square stems) but the easiest way to distinguish the two is leaf shape. Purple dead nettle has a heart or triangular shape whereas henbit has spoked or tooth like leaves.

I usually do my annual collecting in early April, I typically use fresh purple dead nettle but drying it would work as well, although if you’re into energetics at all, you might prefer the fresh plant material. The risk with using fresh plant material is that there is a greater risk for molding or otherwise going bad. I am notoriously negligent at straining my herbed oils and tinctures in a timely fashion, so I just go by the smell test. This year 2021, my purple dead nettle oil did have a distinct funky smell by October, so sadly I had to toss it. Fortunately I had remembered to strain my 2020 oil in time so I used that year for this batch demonstrated here.

Generally speaking you want to keep the plant material in the oil (I use a high quality extra virgin olive oil) for four to six weeks, but as stated above I frequently leave mine for longer, with mixed results. Unlike many things this is one you actually want to leave in a window with some sunlight, skip the southern facing window but something with some sun will help the oil infuse. Shake the jar from time to time.

After four to six weeks strain the oil into a clean quart jar and cap. I always use new lid when I’m making oils or tinctures, unless you’re using jars with glass tops or rubber gaskets to the removable lids can be quite absorbent and you don’t want to be risking cross contamination. Now that your oil is infused you can use it right away, or store for later use. At this point you definitely don’t want it in the light, store some cool and dark.

Here’s my herb cabinet!

If you’re ready to make the salve, find the recipe below!

Purple Dead Nettle Salve

  • Purple dead nettle (half a quart if dried, three quarters of a quart if fresh)
  • Enough olive oil, sunflower oil, or apricot kernel oil to cover the plant material
  • 112 grams (approximately 1C) Beeswax pastilles or block shredded
  • 112 grams (approximately 1C) Raw cocoa butter (food grade)
  • Lavender essential oil
  • Vitamin E oil (optional)
  • Dried lavender flowers
  • 10x 2oz balm tins
  • Double boiler or glass bowl placed over simmer pot of water*

Combine the beeswax and raw cocoa butter into the double boiler, monitor closely, stirring with a popsicle stick.

Once melted add in the herb infused carrier oil, this will cool down the beeswax and cocoa butter so let it return to liquid form, but but very careful that it doesn’t overheat, excessive heat can disrupt some of the plant benefits in the carrier oil.

Once mixed add 5-10 drops of lavender essential oil and if using 20 drops of vitamin E oil. I like to add some dried lavender flowers for scent and visual interest, but it’s definitely not required.

Pour the hot mixture into the balm tins or jars you’re using, let cool, label, and enjoy!

Natural Egg Dyes

There are numerous theories about where the modern practice of dying eggs for easter came from. I’m not an observer of Easter myself, but I have always enjoyed the practice of dying eggs. It’s not lost on me that hunting for eggs has lost its charm since I know have to actually search for eggs around my yard that the chickens may have hidden.

Anyway, now that I’m an adult and in largely in charge of what I put in my food I’m somewhat hesitant to eat artificial dyes, especially if I might end up giving them to friends’ kids.

Some things I like to use as natural dyes: red cabbage, turmeric, red beets, hibiscus tea, frozen blueberries, juices (cranberry/grape) and coffee.

Red and yellow onion skins do add some interesting effects and colors from what I’ve seen online, but as you likely know by now, I am allergic to those so I haven’t tried them.

Hard boiling your eggs! I have a digital pressure cooker, which is now basically the only way I will hard boil my eggs. I don’t have a name brand one, but I just put 4-6 eggs in the cooker with about an inch of water, cook on high for 6 minutes and let it depressurize on its own. This method regularly gives me eggs that are cooked through and with shells that come right off with the ice bath.

If you don’t have a pressure cooker or prefer to do it on the stovetop here’s my suggested method. Place eggs (older are better) in a single layer on the bottom of a medium to large sized pot, cover with cold water to at least one inch above the top of the eggs. Add 1/4 cup white vinegar. Cover and bring to a rolling boil. Remove from heat, keep covered, and let sit for 10 minutes. Using a slotted spoon remove the eggs and add to an ice bath for another 10 minutes. Drain and move to the fridge.

Dying Method

Red Cabbage: Makes light blue to green eggs. 1) Shred 2 cups of red cabbage, fresh is better in terms of the dye potential. 2) Add cabbage to 2.5 cups of water in a medium pot on the stove, bring to a boil, reduce heat and simmer for 15 minutes. 3) Allow to fully cool, strain out the cabbage (compost it if you can). 4) Add two tablespoons of white vinegar. 5) Add two hard boiled eggs to a glass jar (I like wide mouth pints). 6) Cover with the cooled cabbage mixture. 7) Refrigerate overnight.

Hibiscus: Makes black, dark blue, or dark grey eggs. I found a tea mix that included dried blueberries, green tea, and hibiscus flowers. Bring 2.5 cups of water to a boil, add 1/2 cup of dried tea and reduce to a simmer for 15 minutes. Allow to fully cool, strain out the tea. Add two tablespoons of white vinegar. Add eggs to jar, cover with liquid. Refrigerate overnight.

Beet: Makes pink to rosy brown eggs. Peel and dice 2 cups of red beets. Add to a medium sauce pot and cover with 2.5 cups of water. Bring to a boil, reduce to simmer for 15 minutes. Follow steps 3 to 7 from above.

Spinach: Makes green to blue eggs. Chop 2 cups of fresh spinach and add in batches to a pot with 2.5 cups of simmering water. Spinach wilts down so add it slowly so it can all fit, simmer for 10 minutes and follow steps 3-7 above.

Turmeric: Bright yellow cheery eggs. Add 2 tablespoons of dried ground turmeric to 2 cups of simmering water, and continue to simmer for 10 minutes. I do not strain out the ground turmeric for this, I think it adds extra vibrancy to the color. Follow the above steps.

Juices: I use as natural of juice as possible with minimal preservatives and straining. In this case no need to boil or simmer, just add the vinegar and eggs.

Coffee: Yellow to mustard eggs! Use a dark or espresso roast for the best colors. Bring 2.5 of water to boil, add 1/4 cup ground coffee. If you want the eggs to be darker leave the grounds in, if you want something lighter go ahead and strain out the grounds.

Frozen Blueberries: Midrange blues. Add 1.5 cups frozen blueberries to 2.5 cups of water, and bring both to a boil. Follow 3 -7

The next day, carefully remove the eggs from the jars using a spoon (slotted works best) and move to a cookie rack or clean towel. The dyes will likely stain whatever you put underneath them. They can take a while to dry, I suggest turning them with a spoon since fingers can wipe off the color before they dry. Once dry, have fun! Eat em, photograph them, whatever! Refrigerate if not eating within an hour or two.

Get out and explore, there are lots of plants with natural dye abilities, just keep in mind that the eggs may take on some flavor from the ingredients.

Pressure Cooker Chicken Stock

Ingredients:
1 whole cooked chicken carcass (picked over organic rotisserie is great)
2C veggie scraps fresh or frozen (celery, tomato, peppers, carrot, garlic, etc.)
2C mixed fresh herbs (parsley, basil, oregano, rosemary, thyme, etc.)
5-8 bulbs garlic
1Tbs whole peppercorns (I like a variety of black, green, and pink)
2Tbs salt
1-2 "thumbs" of fresh ginger
5 bay leaves
1 tsp red pepper flakes
12C water

Optional, add 1 Oz dried astragulus ,1 Oz dried eleuthero, and 1/2 Oz dried burdock root in cheese cloth or jelly bags for an immune booster and cold busting support.

Combine all ingredients in pressure cooker, cover with roughly 1 gallon of water. Set to “Soup” setting for 2 hours, let pressure release slowly.

Taste broth, and adjust seasoning to preference. 

Set to "soup" setting for another two hours at least. Taste again.

I will sometimes do this over the course over 12 hours alternating between the "warm" and cook setting. I personally like a really dark and deep broth. 

Strain and refrigerate or freeze. If there was meat left on the skeleton that can be reserved to make a quick chicken soup on the spot.

Non pressure cooker version is the same, except done on the stove covered and cooked at a simmer for 3-4 hours.

I keep this broth around all of the time, I'll heat it up and drink it plain or add just some fresh radishes or orzo, but also use it in my chicken noodle soup.